Bringing Depth to Craft: The Ultimate Guide to the 3D Multilayered Bernese SVG
In the world of digital crafting, few things capture attention quite like a piece that leaps off the page. While flat vector designs have long been staples for t-shirts and decals, there is a growing demand for projects that offer dimension, texture, and visual weight. This is where the 3D Multilayered Bernese SVG steps in as a game-changer for makers, designers, and small business owners alike. It is not just a file; it is an invitation to create art that feels tangible, intricate, and deeply personal.
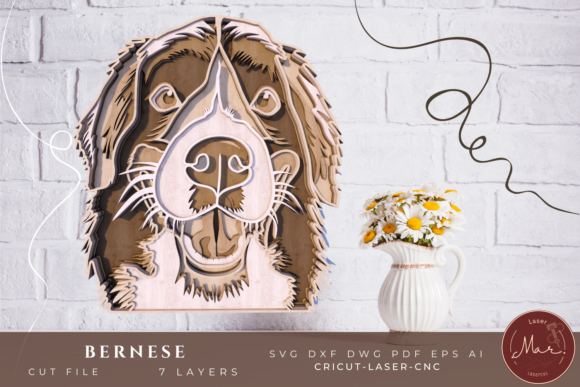
The Bernese Mountain Dog, known for its majestic presence and gentle soul, lends itself perfectly to this multi-dimensional style. By breaking the image down into seven distinct layers, this design allows you to build a scene with depth rather than simply printing a silhouette. Whether you are looking to add a unique touch to your home decor or create high-value items for your online shop, understanding how to utilize this specific digital asset can transform your workflow from simple cutting to complex artistic assembly.
Understanding the Digital Asset: What You Are Getting
Before diving into the cutting process, it is crucial to understand the versatility of the file you are purchasing. This is not a single-layer cut file. You will receive a comprehensive ZIP folder containing the design in multiple professional formats: AI, EPS, SVG, DWG, DXF, and PDF. This variety ensures compatibility regardless of the software ecosystem you prefer, whether you are using Adobe Illustrator, Inkscape, Cricut Design Space, or Silhouette Studio.
The core of this product is the 7-LAYER Overall dimensions structure. When assembled correctly, the finished product measures approximately 281 x 312 mm (11.0 x 12.2 inches). However, one of the greatest advantages of vector-based design is scalability. The size can be adjusted within your cutting machine’s software. If you want a larger statement piece for a living room wall, you can scale up. Conversely, if you are making smaller ornaments, you can reduce the size. Just remember to keep thin items in mind when downsizing; extremely fine details may become difficult to cut or handle if the file is reduced too much.
Material Matters: Choosing the Right Substrate
The success of a 3D layered project relies heavily on material selection. Because the design involves stacking layers, the thickness and rigidity of your chosen medium will dictate the final look and durability. While the instructions suggest flexibility, certain materials yield superior results for this specific dog design.
Wood and MDF: The Classic Choice
If you plan to paint the final piece, wood is arguably the best option. Medium Density Fiberboard (MDF) is highly recommended because it cuts cleanly, holds paint well, and provides a sturdy base. Plywood is another excellent alternative, offering natural grain textures that can complement the rustic charm of a Bernese Mountain Dog. When working with wood, ensure your CNC laser settings are optimized to prevent excessive charring, which can obscure the fine details of the fur patterns in the later layers.
Acrylic and Plexiglas: Modern and Glittering
For a more contemporary aesthetic, colored acrylic with glitter embedded within the material is a stunning choice. Acrylic layers catch light beautifully, giving the 3D effect a jewel-like quality. You might choose a dark blue or black acrylic for the background layers and a white or cream acrylic for the dog’s body to mimic its natural coloring. Combining two materials, such as a wooden base with an acrylic overlay, can also create a striking mixed-media effect.
Paper and Cardboard: Accessible and Artistic
You do not need expensive machinery to enjoy this design. Colored paper and heavy-weight cardboard are fantastic options for hobbyists using manual cutters like the Silhouette Cameo or Cricut Maker. Paper allows for delicate layering and is perfect for shadow box displays or greeting cards. Use cardstock for better stability, ensuring that the layers hold their shape without curling over time. The possibilities are endless here, limited only by your creativity and color palette.
The Assembly Process: From Layers to Masterpiece
Once your materials are cut, the real magic begins. The 3D Multilayered Bernese SVG requires careful assembly to achieve the intended depth. Follow these practical steps to ensure a professional finish:
- Sort Your Layers: Open the reference image provided in the download. This image serves as your blueprint. Identify each layer number and sort your cut pieces accordingly. Keeping them organized prevents confusion during the gluing phase.
- Test Fit: Before applying any adhesive, dry-fit the layers on a flat surface. Check how they align. Since the design is multilayered, slight misalignments can throw off the entire composition.
- Painting and Texturing: This is where you can truly personalize the piece. Paint the layers before or after assembly, depending on your preference. Painting before assembly allows you to reach into crevices easily, while painting after ensures crisp edges between layers. Consider adding texture to the fur layers using sponges or stippling brushes to enhance the realistic feel of the dog.
- Adhesion: Use a strong, clear-drying glue suitable for your chosen material. For wood and acrylic, a hot glue gun works quickly but can leave visible beads. For a cleaner look, use cyanoacrylate (super glue) or a specialized craft adhesive. Ensure each layer is securely bonded before moving to the next.
- Final Inspection: Step back and view the piece from different angles. Adjust any layers that may have shifted during gluing. The goal is a seamless transition between the background elements and the prominent figure of the Bernese.
Practical Considerations for Cutting Machines
Whether you are using a CNC laser machine or a blade cutter like a Cricut or Silhouette, precision is key. When sending the file to your machine, always double-check the scale. As mentioned earlier, if you are reducing the size, pay close attention to the thinnest lines in the design. Laser machines handle intricate details well, but blade cutters may struggle with very small internal cutouts if the material is too thick or the blade is dull.
If you are taking the file to a professional cutting service, communicate clearly about the desired final size. They can adjust the vector paths in the AI or EPS files to meet your specifications. Be sure to specify the material thickness, as this can affect how the layers stack. A thicker material will result in a deeper 3D effect, which might require adjusting the spacing between layers in the design software to prevent overcrowding.
Why Choose This Design?
The appeal of the 3D Multilayered Bernese SVG lies in its balance of complexity and accessibility. It offers enough detail to challenge experienced crafters while remaining structured enough for beginners to follow. The seven-layer system breaks down a complex image into manageable parts, making the assembly process less daunting than trying to carve or cut a single solid piece.
Furthermore, the versatility of the formats included means you are future-proofing your purchase. You can use the SVG for current digital cutters, the DXF for CAD programs, and the PDF for printing physical templates. This adaptability makes it a valuable asset for anyone involved in creative production, from Etsy sellers creating unique home decor to educators teaching students about vector graphics and spatial design.
In conclusion, this digital product is more than just a file; it is a toolkit for creativity. By selecting the right materials, paying attention to layer order, and embracing the painting process, you can create a stunning tribute to one of the most beloved dog breeds. The 3D Multilayered Bernese SVG invites you to explore new techniques, experiment with textures, and produce work that stands out in both appearance and emotional resonance.